So I have decided to also include beauty Q&A on here to help those of us out who have certain issues that cannot be generalized. Samantha Scharf, a local photographer asked this.
" How on earth do people achieve this technique, lol: I have three brushes in my makeup bag to apply eyeshadow with, and I can never seem to get definitive enough colors - maybe I don't have the right kind of brushes? My brushes are from MAC, #239 eye shader brush, #222 blending brush and #275 medium angled shading brush"
Well Samantha, here are your answers!
Firstly, Here is the picture Samantha is asking about. It is a very shimmery Rainbow eyeshadow look.
http://cdn.bellanaija.com/wp-content/uploads/2009/03/p7270051.jpg
http://cdn.bellanaija.com/wp-content/uploads/2009/03/p7270051.jpg
As you can see there is a nice gradient from one color to the next and it goes around the whole of the eye.
Now I think shimmer is as beautiful as the next person, but I have also been falling in love with matte colors (no shimmer at all) and I find the color intensity to be so much stronger! So I did one eye matte and the other with shimmer just to compare!
Here we go!
Step one - Add a white base to the eye - All colors of eyeshadow look nicer when a base is applied. It amplifies the color and gives the make-up a longer time before touch-ups. For the Matte eye, I used Revlon Eyeliner in White. For the Shimmery eye I used NYX Jumbo Eye Pencil in Cottage cheese (I know that is like the worst name for make-up in the history of cosmetics, but the color is gorgeous!). Both products create a white base so the colors are not altered by the color of our skin. Apply to the eyelid and blend out with finger to get rid of any harsh lines. Also apply a thin line to the lower lash line.
Step 2 - Brush Conundrum- For this look, I used only 1 brush. The MAC #239 Shader brush. It packs on the color and eases blending of larger areas on the eye. The brush might not be the problem. It could be that you are swiping on the colors instead of patting them on the eyelid. The problem could also be the eyeshadow you use. If you use MAC, not all MAC shadows are created equal. Ever since they were bought out by Estee Lauder, the formulations have changed for a lot of products.
Forgive the dirty brush, I took the picture of it after using it.


Step 3 - Add Yellow!- With the MAC 239, apply a vibrant yellow to the inner third of your eye (Above and below). For the Matte yellow, I used ButterCupcake by SugarPill. For the Shimmery Yellow I used Sun Yellow by Ben Nye.
 Step 4 - Add Orange - With your brush take a little of your orange eyeshadow and place a thin strip of it next to the yellow. For the shimmery side, I used Tangerine by Ben Nye. I unfortunately did not have a decent matte orange so one was created with blending of pink and yellow. That will be on the next step. When blending from one color to another, go from the lighter to the darker. Wipe off brush and carry the yellow into the orange until there is no harsh line.
Step 5 - Add Pink- I did not have a matte orange that was any good, so I made a thicker strip of the matte pink (Dollipop by Sugarpill) and blended a tiny area between to 2 to create a matte orange. If you find the pink is trying to take over, add more yellow and keep blending. For the Shimmery side, I added a thin strip of pink (Azalea by Ben Nye) and blended into the orange color.


Step 6 - Add purple and blue- I kind of skipped the purple step on the first side to I kind of had to skip it for the other side so my steps would not get all mixed up.
For the Matte side, I added a small amount of purple (Poison Plum by
 Sugarpill) and then added a small bit of a dark matte blue from my 120 color eyeshadow palette from e-bay. Best 20 bucks ever spent! The blue went on the very outer corner of the eye and below the lash line leaving a space on the lower lash line for the green.
For the Shimmery side, I added a small amount of purple (Amethyst by Ben Nye) and blue (cosmic blue by Ben Nye) to the outer corner. Like above, the blue went on the very outer corner and below the lash line leaving a space on the lower lash line for the green.

 Step 7 - Add Green!- For the matte side I took a matte lime green from the e-bay 120 palette and connected the yellow and the blue on the lower lash line. Blending the green into the yellow and the blue to create a gradient. For the Shimmery side I took a chartreuse green (Chartreuse by Ben Nye) and did the same thing.
Step 8 - CONTOUR THE EYE AND HIGHLIGHT- Personally, I like contouring the eye,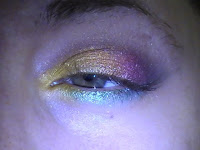 but this is totally optional!
The reason I used a matte highlight color is because shimmer over the eye can get to be a bit much, and I did not want to take away from the eyeshadow colors. You can use a shimmery champagne color if you like.
Step 2 - Brush Conundrum- For this look, I used only 1 brush. The MAC #239 Shader brush. It packs on the color and eases blending of larger areas on the eye. The brush might not be the problem. It could be that you are swiping on the colors instead of patting them on the eyelid. The problem could also be the eyeshadow you use. If you use MAC, not all MAC shadows are created equal. Ever since they were bought out by Estee Lauder, the formulations have changed for a lot of products.
Forgive the dirty brush, I took the picture of it after using it.


Step 3 - Add Yellow!- With the MAC 239, apply a vibrant yellow to the inner third of your eye (Above and below). For the Matte yellow, I used ButterCupcake by SugarPill. For the Shimmery Yellow I used Sun Yellow by Ben Nye.
Step 5 - Add Pink- I did not have a matte orange that was any good, so I made a thicker strip of the matte pink (Dollipop by Sugarpill) and blended a tiny area between to 2 to create a matte orange. If you find the pink is trying to take over, add more yellow and keep blending. For the Shimmery side, I added a thin strip of pink (Azalea by Ben Nye) and blended into the orange color.

Step 6 - Add purple and blue- I kind of skipped the purple step on the first side to I kind of had to skip it for the other side so my steps would not get all mixed up.
For the Matte side, I added a small amount of purple (Poison Plum by

For the Shimmery side, I added a small amount of purple (Amethyst by Ben Nye) and blue (cosmic blue by Ben Nye) to the outer corner. Like above, the blue went on the very outer corner and below the lash line leaving a space on the lower lash line for the green.

Step 8 - CONTOUR THE EYE AND HIGHLIGHT- Personally, I like contouring the eye,

The reason I used a matte highlight color is because shimmer over the eye can get to be a bit much, and I did not want to take away from the eyeshadow colors. You can use a shimmery champagne color if you like.
SHIMMERY VS MATTE

As you can see, the matte is way more intense since the color is not competing with light reflecting minerals in the shimmery shades. Hence why I like matte better. Forgive the fact that I look all bug eyed and weird. There is no concealer, mascara, or brow correction done at this point so I look awful! Plus I raised one eyebrow for some unknown reason... weird.
WORD OF THE WISE! Do not attempt matte until you have attempted the shimmery version first!
I say this because shimmers are easier to blend than matte colors. If you don't normally use matte, it takes a bit of practice to get used to blending them nicely together.
All SugarPill Cosmetics are available at http://www.sugarpillshop.com
All Ben Nye colors are available at http://www.bubbasikes.com/supersavers.html
Swatches of the colors are available at http://glamazonbeautyblogging.blogspot.com/2010/07/new-gym-swatches-and-importance-of-good.html
The 120 color palette was an e-bay find, some are available for cheap!
WARNING - THE COLOR PAYOFF ON THIS PALETTE IS NOT ALWAYS VERY GOOD AND THE GLITTERY COLORS COULD CONTAIN TRACES OF METAL GLITTER DEPENDING ON THE MANUFACTURER, SO USE THE GLITTER COLORS AT YOUR OWN RISK or CONTACT THE MANUFACTURER FIRST!
So hopefully this has answered your questions Sam! Also if you happen to need a photographer, check Sam out at
http://www.facebook.com/#!/pages/Samantha-Scharf-Photography/123221694356630
Her work is GORGEOUS!
http://www.facebook.com/#!/pages/Samantha-Scharf-Photography/123221694356630
Her work is GORGEOUS!
And Until Next time Glamazons,
STAY SEXY!
STAY SEXY!
No comments:
Post a Comment