Saturday, December 4, 2010

Tips of the week TRIPLE TROUBLE - Making Small eyes look bigger, Big Eyes Smaller, and a pin-up look for glasses!

Hello Glamazons!

So, not all of us have large eyes. Some of have deep set or small eyes. For those that do, smoky eyes and other dark looks tend to make small eyes look smaller.

Before I start this blog off, just going to say that I have recently bought some drugstore products to review for you! I lucked out and the Rexall I went to had a gala so I got some gratis that I otherwise would not have. So THANKS Rexall! Products from NYX, Covergirl, Physician's Formula, and Maybelline will be reviewed in the future!


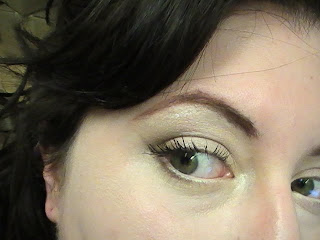
THE FOLLOWING STEPS COVER HOW TO MAKE SMALL EYES LOOK BIGGER!


Before going to step 1, remember, have a freshly cleaned faced, and moisturize under your eyes. Dark under-eyes not only make you look tired, but it draws the attention to a negative aspect of your face.


STEP 1 : Use a flesh colored base on your eye lids such as MAC Paintpot in "Painterly" (about $20 at any MAC Store) or "Stay Don't Stray" Eyeshadow and concealer primer fro Benefit ($24 at Sephora). The flesh tint evens out the skin tone and removes a lot of darkness from under the eye.

STEP 2 : Take a white eyeliner and line the water line on the bottom lid. This will give the appearance of a larger and more "awake" eye.

STEP 3 : With a Shader brush, take a shimmery cream color that is close to your skin tone and apply to the lid. Using the same brush take a brown a couple of shades darker than your skin tone and pop it in the crease to add definition to your eye.

STEP 4 : Using a pencil brush take a small amount of that darker brown shadow and apply to the most outer corner of the eye and bring under the eye only a little bit. This adds definition without closing the eye. If need be, re-apply the white to the waterline.

STEP 5:
Take a color lighter than the color you used on the lid, and apply to the brow bone area as a highlight. Quickly use a tissue to wipe excess color of your pencil brush. Take the really light color and apply to the inner corners of your eye. This makes them appear wider and more awake and alert.

STEP 6 : Taking some individual lashes (I use Ardell, available at Rexall and various drugstores. Usually under $6), Apply to outer third of the top lash-line. This creates a doe-eyed effect that you would not get with a full lash strip. Apply as many as needed to make the eyelashes on the outer corner full and lush. I used DUO Eyelash adhesive. Allow for the glue to become tacky before you place on the lash-line. It takes a bit of practice, but the results are worth it!

STEP 7:
Now apply a Mascara to blend in the natural lashes into the fake lashes. Be sure to apply less on the inner corners since we don't want to close your eye off and render the work we just did useless. I used Dramatic Black Falsies Mascara by Maybelline (available at most drug stores for under $10).

STEP 8:
Take a brow powder and softly fill in the eyebrows with a angled eye brush. The powder should be a little ashy in comparison to your actual brows. Blend into brows with a clean spoolie brush (Clean mascara wand).


To make Large eyes look smaller, just do the opposite! EASY PEASY!


YOU CAN STOP HERE IF YOU WANT OR YOU CAN KEEP GOING FOR THE FULL FACE LOOK AND A LITTLE TWEAK THAT MAKES THIS LOOK GOOD FOR GLASSES!

STEP 9: After cleaning any fallout from the shadow, Use concealer. Apply with concealer brush or tap lightly with fingertips under the eyes until blended. Set with translucent powder. Apply foundation as normal and set with powder as well.

Step 10: Take a nice peachy blush and apply to the apples of your cheeks and a little up the cheekbone (Available from Sephora for $24)

Step 11: Take a simple color of Gloss like a pinky neutral shade, and apply with lip brush
VOILA! YOU ARE DONE!


To Bump this look up a notch and make it a pin-up/glasses look, you need to do the following things
1 - take a liquid or gel liner and line the eye making the line heavier towards the outside of the eye and making a cat-eye.

2 - Don't use a pink gloss! Instead use concealer over your lips and set with powder. Then take a vixen red color (I use Cherry by MAC) and line the lips. Fill in the lips with the liner as well to prolong wear and minimize touch-ups.

3- Then fill with a red lipstick (I use Brick by Elizabeth Arden) and use a red tinted Gloss (Vinyl Gloss from Rimmel) in the middle to make the lips look full. If you want a crisper line, take a clean concealer or lip brush and go around the outside of the lips with concealer and blend out to get rid of any harsh lines.


And Voila! Pin-up Goodness that works with Glasses! I was on my lunch when taking photos so I did not do red lips on myself. That would have been awkward. lol!

Until Next time Glamazons!
STAY SEXY WITHOUT RESORTING TO DUCK LIPS!!!!


Monday, November 29, 2010

TIP OF THE WEEK - LATE!!!!!! I KNOW!!!!

Hello Glamazons!

So all newbies in make-up had to start with sponge applicators. You know those double ended things that came in a cover girl eyeshadow?

If you still use them, I implore you. Please buy a set of Make-up Brushes!

HERE IS WHY!
Better Application - with different brushes you can do different techniques (lining, blending, shading, etc.). With sponges you have very heavy and limited application techniques.
Easy to Clean - Anyone that has ever tried to wash a sponge applicator knows that the minute it hits any water/cleaner, the glue holding the sponge on will let go and it becomes useless.

No Waste - You could buy disposables or even use q-tips, but that is a waste of material and you are still really no better off.

Not A Germ Factory - I can pretty much guarantee, that 9 out of 10 people that still use the sponge in their eyeshadow case, don't wash or replace it until it is falling apart. This is incredibly unsanitary. Not to mention the sponge can soak up any oil of the surface of your eye and transfer it to the eyeshadow where it gets soaked in, dries, and then renders your eyeshadow into a useless brick.


BASIC BRUSHES TO OWN!
Now I am not saying you have to go out and buy MAC brushes for yourself as I know they are incredibly expensive. I have them on here as examples so you can see the basic shape of the brushes.


BRUSH FOR LIPS
: Having a lip brush is essential. It gives you better control over your lip product and it fills in any lip lines much better than just straight from the tube application. A lip brush allows you to have a crisp line around your lips with more ease.


BRUSHES FOR EYES:


FLAT ANGLED LINER BRUSH
: This brush can be used to line your eyes with cream, liquid, or powder. It can also be used to fill in your eyebrows!


CONCEALER BRUSH
: This brush makes concealer application closer to the eye and over the face a lot easier. It can also be used to apply an eyeshadow base to the lid.


PENCIL BRUSH: For precise Eyeshadow application. This brush is fantastic for smudging eyeliner above and below the eye. Plus it is really good for contouring the eye and placing shimmer in the inner most corners of the eye.


SHADER BRUSH: This brush is amazing for patting eye color onto the lid, and for blending colors into one another. It also helps when smudging out an eyeshadow base to get rid of any harsh lines.


BRUSHES FOR THE FACE:


KABUKI BRUSH
: This brush is amazing for buffing powder
foundation or translucent (colorless) setting powder into the skin. Using this brush in small circular motions gets rid of excess product and keeps the skin from looking too cakey. ALSO it is fantastic for buffing grease paint color onto the skin and gives an airbrushed effect.


ANGLED CONTOUR BRUSH: This is one of my all time favorite brushes! It is incredibly versatile! You can use it to contour the face creating more depth and dimension, you can use it to apply blush and highlight to the cheekbones, AND you can use it to apply bronzer on key areas on your face. By far the best of all my brushes!


FOUNDATION BRUSH
: This brush is also multi-purpose. You do not have to just use it for foundation! You can use it to apply a foundation base to the skin, and any color of aqua color and it gives really good application. Plus you don't waste as much product since the brush does not soak up product like a sponge.


YOU DO NOT HAVE TO USE THESE BRUSHES IN THIS WAY, NOR ARE THEY THE ONLY BRUSHES YOU SHOULD BUY. I AM USING THE MAC BRUSHES AS EXAMPLES SO YOU CAN SEE THE SHAPES.

Now with brushes, whether you use them on yourself or someone else, they need to be cleaned on a regular basis. If you don't they become a bacteria breeding ground and can cause a whole mess of problems including infections on your face. I find that buying brush cleaner just does not cut it anymore. It is too expensive to keep buying so I have a formula for my brush cleaner that works amazing and is WAY CHEAPER!

Courtney's Spot Cleaner
*1 part Neutrogena Anti-Residue Shampoo or a deep conditioning shampoo
1 part Dish soap (Unscented)
6 parts distilled water
1 part isopropyl alcohol
*Depending on your brushes, if you have Synthetic Hair brushes, use the Neutrogena. If you have natural hair brushes, use a deep conditioning shampoo. If you are unsure, use the deep conditioning shampoo. It keeps the bristles from becoming brittle and breaking in natural hair brushes.


I hope this has been helpful and until next time Glamazons,

Stay Sexy!

Friday, November 19, 2010

Beauty Questions 2 - Smoky Eyes (No Sad Pandas)

Hello my Glamazons!

So A friend of mine from way back, Sarah, asked this question:

"Hey Courtney, how do I do a smokey eye? I can't seem to get it right, always end up looking like a dead panda."

If that is not descriptive, I honestly don't know what is. LOL!

So to answer her question, I am going to do the most basic easy smoky eye there is!
I chose to do a smoky gray eye since colors might seem a little much and black is not forgiving.
Once again, I am only going to use a MAC #239 for the eyeshadow!


Step by Step, here we go!


STEP 1 : Apply Black Eyeliner pencil to the upper lash line. I apologize for the blurry picture! I used L'Oreal HiP Eyeliner Pencil. There is more info in my November Products of the Month Blog. You can make this line quite thick since you will be smudging it out right away.

*Sidenote* I completely forgot to put a base on my eye so if you notice minor creasing of product, that is why


STEP 2 : Quickly use brush to smudge out line before the liner dries.


STEP 3:
Using a blue tinged gray such as "Scene" by MAC, Go over the eyelid and blend up towards the eyebrow not going much past the crease.


STEP 4: Use the same liner and line the bottom lash line, smudge it out, and apply "Scene" over top.


STEP 5: Tight line the eye (TRANSLATION: Line the most inner parts of the eye, top and bottom)


STEP 6:
Wipe brush of excess product and use a flesh tone under the brow bone and blend into "Scene" to create a nice smoky gradient. I just used my regular face powder. Also, I took a little of "Dazzlelights" by MAC and applied it to the innermost corners of my eyes to give the eyes a little more intensity.


STEP 7: With an oil free eye make-up remover and a q-tip, clean the under-eye area of any fallout and even out the smudging on both sides. Proceed with concealer,foundation, and powder to set.


STEP 8: Fill in brows! You will look off if your eye make-up is dark and your brows are not defined. btw, I plucked and it hurt like a hot damn! FOR YOU!!!!!!!! lol! Apply 2 coats of mascara. I used Falsies Dark Volume Mascara. I cannot remember who it is by but it comes in the purple tube. I think it is Maybelline? If desired, apply false lashes, but as you can see, I do not need them... yes this is me gloating.


YOU COULD STOP HERE OR KEEP GOING WITH MY NEXT STEPS!


STEP 9:
Take a brown a little darker than your natural skin tone and an angled face brush. Suck in your cheeks (make fish lips) and apply the brown in the sunken area. Blend down. Repeat application with a wine colored blush and apply lightly.


STEP 10
: Take a frosty pink lip color and apply with fingertips to lips. This keeps the application from being too thick. You want a sheer application. Anything too thick and you are branching into Jersey Shore territory.

On top of that, take a brown/pink gloss and use in the center of the lips. This will give an illusion of fullness to your lips if they have none, and it's dead shmexy!


DONE! TA DAA!


Now this look is very sultry for those who do not wear glasses, but for those who do (To answer Kendra's Question) this look is AMAZING WITH GLASSES! It can actually be considered work appropriate with glasses since glasses take some of the intensity away from the make-up.

You can do several variations. Deep greens, browns, purples, blues, teals *wink wink*, etc.
Only work with Black for this look when you have gotten some practice with the Gray. Black does not forgive easily and it is very easy to over-do it. I have done so one more than 1 occasion.


UNTIL NEXT TIME GLAMAZONS!

STAY SEXY! LOL!

Wednesday, November 17, 2010

Beauty Questions 1 - Rainbow Eyes and Blending

Hello Glamazons!

So I have decided to also include beauty Q&A on here to help those of us out who have certain issues that cannot be generalized. Samantha Scharf, a local photographer asked this.

" How on earth do people achieve this technique, lol: I have three brushes in my makeup bag to apply eyeshadow with, and I can never seem to get definitive enough colors - maybe I don't have the right kind of brushes? My brushes are from MAC, #239 eye shader brush, #222 blending brush and #275 medium angled shading brush"

Well Samantha, here are your answers!
Firstly, Here is the picture Samantha is asking about. It is a very shimmery Rainbow eyeshadow look.

http://cdn.bellanaija.com/wp-content/uploads/2009/03/p7270051.jpg

As you can see there is a nice gradient from one color to the next and it goes around the whole of the eye.
Now I think shimmer is as beautiful as the next person, but I have also been falling in love with matte colors (no shimmer at all) and I find the color intensity to be so much stronger! So I did one eye matte and the other with shimmer just to compare!
Here we go!

Step one - Add a white base to the eye - All colors of eyeshadow look nicer when a base is applied. It amplifies the color and gives the make-up a longer time before touch-ups. For the Matte eye, I used Revlon Eyeliner in White. For the Shimmery eye I used NYX Jumbo Eye Pencil in Cottage cheese (I know that is like the worst name for make-up in the history of cosmetics, but the color is gorgeous!). Both products create a white base so the colors are not altered by the color of our skin. Apply to the eyelid and blend out with finger to get rid of any harsh lines. Also apply a thin line to the lower lash line.

Step 2 - Brush Conundrum- For this look, I used only 1 brush. The MAC #239 Shader brush. It packs on the color and eases blending of larger areas on the eye. The brush might not be the problem. It could be that you are swiping on the colors instead of patting them on the eyelid. The problem could also be the eyeshadow you use. If you use MAC, not all MAC shadows are created equal. Ever since they were bought out by Estee Lauder, the formulations have changed for a lot of products.

Forgive the dirty brush, I took the picture of it after using it.


Step 3 - Add Yellow!- With the MAC 239, apply a vibrant yellow to the inner third of your eye (Above and below). For the Matte yellow, I used ButterCupcake by SugarPill. For the Shimmery Yellow I used Sun Yellow by Ben Nye.


Step 4 - Add Orange - With your brush take a little of your orange eyeshadow and place a thin strip of it next to the yellow. For the shimmery side, I used Tangerine by Ben Nye. I unfortunately did not have a decent matte orange so one was created with blending of pink and yellow. That will be on the next step. When blending from one color to another, go from the lighter to the darker. Wipe off brush and carry the yellow into the orange until there is no harsh line.


Step 5 - Add Pink- I did not have a matte orange that was any good, so I made a thicker strip of the matte pink (Dollipop by Sugarpill) and blended a tiny area between to 2 to create a matte orange. If you find the pink is trying to take over, add more yellow and keep blending. For the Shimmery side, I added a thin strip of pink (Azalea by Ben Nye) and blended into the orange color.


Step 6 - Add purple and blue- I kind of skipped the purple step on the first side to I kind of had to skip it for the other side so my steps would not get all mixed up.

For the Matte side, I added a small amount of purple (Poison Plum by Sugarpill) and then added a small bit of a dark matte blue from my 120 color eyeshadow palette from e-bay. Best 20 bucks ever spent! The blue went on the very outer corner of the eye and below the lash line leaving a space on the lower lash line for the green.

For the Shimmery side, I added a small amount of purple (Amethyst by Ben Nye) and blue (cosmic blue by Ben Nye) to the outer corner. Like above, the blue went on the very outer corner and below the lash line
leaving a space on the lower lash line for the green.

Step 7 - Add Green!- For the matte side I took a matte lime green from the e-bay 120 palette and connected the yellow and the blue on the lower lash line. Blending the green into the yellow and the blue to create a gradient. For the Shimmery side I took a chartreuse green (Chartreuse by Ben Nye) and did the same thing.


Step 8 - CONTOUR THE EYE AND HIGHLIGHT- Personally, I like contouring the eye, but this is totally optional!

The reason I used a matte highlight color is because shimmer over the eye can get to be a bit much, and I did not want to take away from the eyeshadow colors. You can use a shimmery champagne color if you like.

SHIMMERY VS MATTE

As you can see, the matte is way more intense since the color is not competing with light reflecting minerals in the shimmery shades. Hence why I like matte better. Forgive the fact that I look all bug eyed and weird. There is no concealer, mascara, or brow correction done at this point so I look awful! Plus I raised one eyebrow for some unknown reason... weird.

WORD OF THE WISE! Do not attempt matte until you have attempted the shimmery version first!
I say this because shimmers are easier to blend than matte colors. If you don't normally use matte, it takes a bit of practice to get used to blending them nicely together.

All SugarPill Cosmetics are available at http://www.sugarpillshop.com

All Ben Nye colors are available at http://www.bubbasikes.com/supersavers.html
Swatches of the colors are available at http://glamazonbeautyblogging.blogspot.com/2010/07/new-gym-swatches-and-importance-of-good.html

The 120 color palette was an e-bay find, some are available for cheap!
WARNING - THE COLOR PAYOFF ON THIS PALETTE IS NOT ALWAYS VERY GOOD AND THE GLITTERY COLORS COULD CONTAIN TRACES OF METAL GLITTER DEPENDING ON THE MANUFACTURER, SO USE THE GLITTER COLORS AT YOUR OWN RISK or CONTACT THE MANUFACTURER FIRST!

So hopefully this has answered your questions Sam! Also if you happen to need a photographer, check Sam out at
http://www.facebook.com/#!/pages/Samantha-Scharf-Photography/123221694356630
Her work is GORGEOUS!


And Until Next time Glamazons,
STAY SEXY!

Monday, November 15, 2010

Tip of the week! YAY!

So following suit, not only do we have products of the month, but now I am embarking on tips of the week! EGADS BATMAN!

So tip #1 : If you are in a bind, or feel like being colorful, Eyeshadows and loose pigments can be used as eyeliner!

Now I know this sounds a bit odd to some, but believe me it is really easy and it opens up your kit to a whole new set of possibilities!

I am going to go through the different methods

1. VISINE/WATER - Now, mixing visine with loose pigments or pressed shadows is all fine and dandy, but for prolonged wear, it is no good. Visine just dries. It does not set the make-up. If you wish to use this method to intensify eye looks or create really vivid smoky eyes. If you are using it to create a sharp line, it will not stay put.

WARNING: Not all shadows are meant to be used wet, check with the manufacturer to ensure you do not wreck your shadow or scrape a little of the pressed shadow into a palette so you do not risk ruining a good product.

2. Eyeliner Sealing Liquid - Here is where the money is my lovelies! Using an eyeliner sealant such as Make-Up Forever Eye Seal will waterproof your self made liners and give them incredible staying power! Also it is good if you want to make sure your pencil liners stay in place!

ALSO! You can mix the Eye Seal with fine glitter and create your own waterproof glitter liners! Isn't that awesome!?

WARNING: If you plan on using a pressed shadow as a liner, scrape some into a small dish or palette and work from there. Once the sealing Liquid has saturated the eyeshadow and dries, it becomes a brick and you can no longer use it.


3. Setting Spray/Setting Liquid - Now if you find you are stuck with the visine or water option, Setting Spray is your Best Friend! I like MAC Fix+Spray. It is really easy to use and it has an easy twist lid to ensure that it locks and does not spray inside your bags. There is also Shelaq by Benefit Cosmetics. It is a sealing liquid that is good for setting not only eyeshadow, but lipstick too!

The Eye Seal ($20) and Shelaq ($30) can be purchased at any Sephora location.
The Mist+Fix ($20-25) can be purchased at any MAC location.


All Photos are from either t
he official SEPHORA or MAC Websites. None are mine.


So Until Next Time Glamazons,
Stay Sexy!

Friday, November 12, 2010

Taking some time off and Products of the Month!

Hello All My Glamazons!

So after some very serious consideration and an emotional breakdown, I have decided that even though I love doing Make-up, I need some time to put all my finances in order and get out of debt. At the rate I am going, I can't pay anything off.

There is not enough paid work out there for me to make even a part time living at it. So until the spring, I am taking only select paid work since I will be looking for a part time job to help me get out of debt before anything gets too serious for me to handle. No more TFP until further notice.

But no worries, any shoots I have committed to doing will still be done. I won't flake out on you guys!

I am going to do products of the month for you guys, I will probably have more time for my blog now, I am going to do products of the month (Best, Worst, Honorable Mention).

BEST PRODUCT OF THE MONTH!
Product : L'Oréal HiP Pencil Liners
Collection: Midnight Muse
Purchased : Shopper's Drug Mart
Price Range: Inexpensive (8.99 to 10.99)

Good Stuff: This eyeliner is absolutely amazing! It has a dreamy creamy feel. This is hands down the best pencil eyeliner I have come across in my life. It creates a smooth line and smudges like a dream. There is absolutely NO pull from this pencil. I adore the colors they came out with for this collection. There is Dark Romance which is a deep Plum, Dark Night which is supposedly a black/brown, but it does not show up brown to me. It could just be me? And Dark Sky which is a rich chocolate brown. Granted, I did not think these had any staying power because of the consistency, but boy was I WRONG! It stayed quite well! I was impressed. The colors are quite lovely and I will have to do some swatches in the future of these!

Bad Stuff: This eyeliner is part of a limited edition collection, so get your hands on them while you can! Also if your eyelids are oily, do apply an eyeshadow base to your eye prior to applying the eyeliner to ensure it does not move on you throughout the day.


WORST PRODUCT OF THE MONTH!
Product : Cover Girl Exact Eyelights Eye Brightening Eyeliner
Collection: Exact Eyelights
Purchased : Shopper's Drug Mart
Price Range: Inexpensive (8.99 to 11.99)

Good Stuff: There seems to be a decent collection of colors

Bad Stuff: Sometimes Cover Girl can come out with a product that wows me... this was SO NOT one of these products. The pigmentation is awful, and it has NO staying power. I do not like the consistency and the longevity. This product might be good if you are going to the bar for an hour or 2 but for all day wear, this product is awful.


HONORABLE MENTION!

Product : Burt's Bees Lemon Butter Cuticle Cream
Collection: Seen in the HandCare Collection
Purchased : Shopper's Drug Mart
Price Range: Inexpensive (7.99 to 8.99)

Good Stuff: This stuff is like miracle in a tin. It is not only amazing as a cuticle cream, but it is good for
-dry skin patches
-lip balm
-Emergency Flyaway tamer

I used it recently very lightly to tame some flyaways at a shoot. The hair was still shiny. the flyaways were gone and it left a very nice scent to the hair. I would not recommend this all the time as the product does contain beeswax and can mattify your hair and cause build-up over time. It has a delicious lemon scent that makes you just smile when you smell it! Also it is 95% natural, not tested on animals, and is paraben/phthalate free!

Bad Stuff: It can seem a little gunky and heavy at first. Some people might find the scent a little strong. Plus the tin, the lid is like hell to get off if you already have product on your fingers, so do not close the lid until you are sure you've got enough out.


I wish all the best for my Glamazons and until next time,
Stay Sexy!